
Building Forms in .NET MAUI Without Writing UI Code - My Journey with Plugin.Maui.DynamicForms
You know that feeling when you're staring at yet another XAML file, copying and pasting the same form controls for the hundredth time? Yeah, I was there. Customer forms, employee records, settings screens - they all started blending together. That's when I decided: there has to be a better way.
So I built one. Let me show you how Plugin.Maui.DynamicForms works, from zero to a fully functional, validated, API-connected form.
The Problem I Was Trying to Solve
Picture this: You're building an admin panel. You need forms for users, products, orders, settings... the list goes on. Each form needs:
- ✅ Input validation
- ✅ Professional styling
- ✅ Data loading from an API
- ✅ Error handling
- ✅ Data persistence back to the API
The traditional approach? Hundreds of lines of XAML, repetitive code-behind, and a lot of copying and pasting. I wanted something better.
Step 1: Adding DynamicForms to Your App
First things first - let's get the package installed. Open your terminal in your .NET MAUI project:
dotnet add package Plugin.Maui.DynamicForms
Now, head over to your MauiProgram.cs. You'll need the CommunityToolkit (if you don't have it already):
using CommunityToolkit.Maui;

public static class MauiProgram
{
    public static MauiApp CreateMauiApp()
    {
        var builder = MauiApp.CreateBuilder();
        builder
            .UseMauiApp<App>()
            .UseMauiCommunityToolkit()  // This is required
            .ConfigureFonts(fonts =>
            {
                fonts.AddFont("OpenSans-Regular.ttf", "OpenSansRegular");
                fonts.AddFont("OpenSans-Semibold.ttf", "OpenSansSemibold");
            });

        return builder.Build();
    }
}
Last setup step - add the default styles to your App.xaml:
<Application xmlns="http://schemas.microsoft.com/dotnet/2021/maui"
             xmlns:x="http://schemas.microsoft.com/winfx/2009/xaml"
             xmlns:styles="clr-namespace:Plugin.Maui.DynamicForms.Resources.Styles;assembly=Plugin.Maui.DynamicForms"
             x:Class="YourApp.App">
    <Application.Resources>
        <ResourceDictionary>
            <ResourceDictionary.MergedDictionaries>
                <styles:FormStyleDefault />
            </ResourceDictionary.MergedDictionaries>
        </ResourceDictionary>
    </Application.Resources>
</Application>
That's it for setup. Seriously.
Step 2: Creating My First Form
Let's build a customer form. Here's what I love about this library - the fluent API. It reads like English:
using Plugin.Maui.DynamicForms.Factories;
using Plugin.Maui.DynamicForms.Models;

public partial class CustomerFormPage : ContentPage
{
    private List<FieldMetaData> _formFields;

    public CustomerFormPage()
    {
        InitializeComponent();
        BuildCustomerForm();
    }

    private void BuildCustomerForm()
    {
        _formFields = new FormBuilder()
            .BeginBlock("Customer Information")
                .AddTextField("CompanyName")
                    .WithCaption("Company Name")
                    .WithRequiredValidation()
                .AddTextField("ContactPerson")
                    .WithCaption("Contact Person")
                    .WithRequiredValidation()
                .AddTextField("Email")
                    .WithCaption("Email Address")
                    .WithRequiredValidation()
                .AddTextField("Phone")
                    .WithCaption("Phone Number")
            .NextBlock()
            .BeginBlock("Address Details")
                .AddTextField("Street")
                    .WithCaption("Street Address")
                    .WithRequiredValidation()
                .AddTextField("City")
                    .WithCaption("City")
                    .WithRequiredValidation()
                .AddTextField("PostalCode")
                    .WithCaption("Postal Code")
                .AddSelect("Country", "USA,Canada,UK,Germany,France,Spain")
                    .WithCaption("Country")
                    .WithRequiredValidation()
            .NextBlock()
            .BeginBlock("Additional Information", isExpanded: false)
                .AddCheckbox("IsActive")
                    .WithCaption("Active Customer")
                .AddTextArea("Notes")
                    .WithCaption("Internal Notes")
            .Build();

        MyFormView.FormFields = _formFields;
    }
}
And in your XAML? One line:
<ContentPage xmlns="http://schemas.microsoft.com/dotnet/2021/maui"
             xmlns:x="http://schemas.microsoft.com/winfx/2009/xaml"
             xmlns:forms="clr-namespace:Plugin.Maui.DynamicForms.Controls;assembly=Plugin.Maui.DynamicForms"
             x:Class="YourApp.CustomerFormPage"
             Title="Customer Details"
             SafeAreaEdges="All">

    <forms:DynamicFormView x:Name="MyFormView" />

</ContentPage>
That's it. You now have a fully functional, three-section form with expandable blocks. No Grid definitions, no StackLayouts, no positioning headaches.
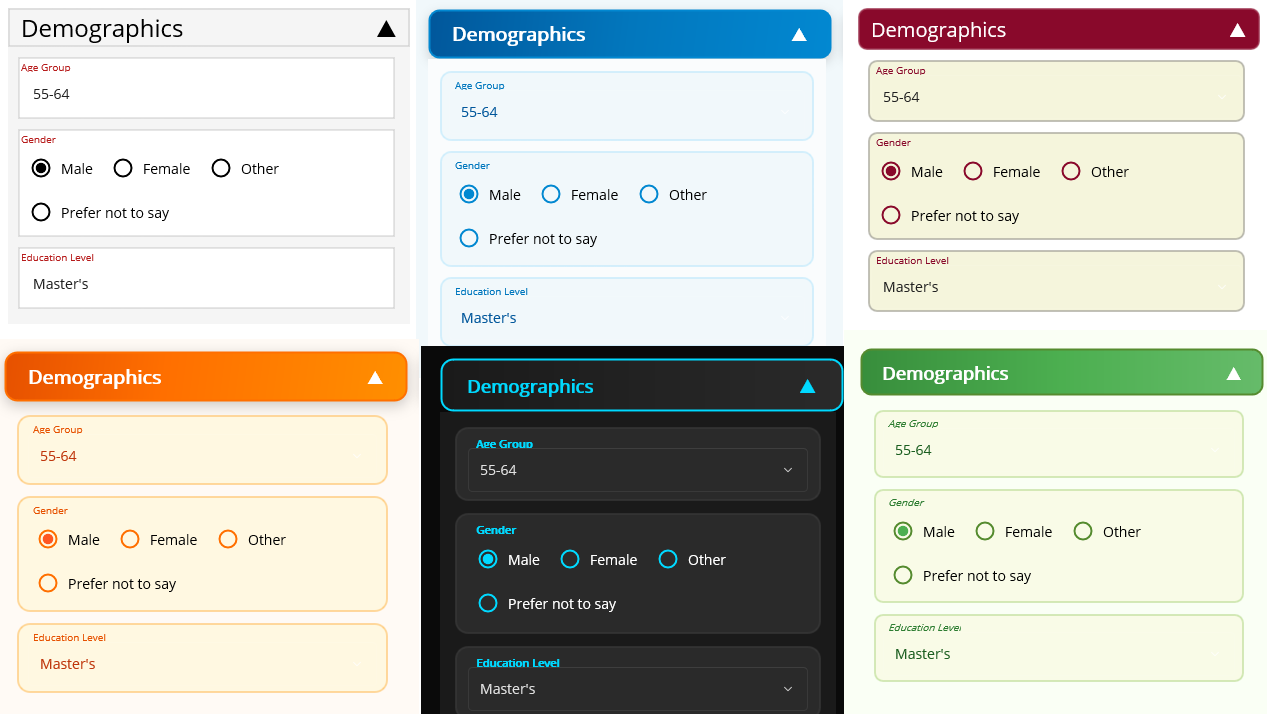
Step 3: Making It Look Good
Out of the box, the form looks professional. But what if you want your own brand colors? The ample app on Github has 8 built-in themes -copy one from there or you can create your own.
Let me show you how I switched to the "Modern Dark" theme at runtime:
using Plugin.Maui.DynamicForms.Sample.Resources.Styles;

private void ApplyModernDarkTheme()
{
    // Remove old style
    var oldStyle = Application.Current.Resources.MergedDictionaries
        .FirstOrDefault(d => d.Source?.OriginalString?.Contains("FormStyle") == true);

    if (oldStyle != null)
        Application.Current.Resources.MergedDictionaries.Remove(oldStyle);

    // Add new style
    Application.Current.Resources.MergedDictionaries.Add(new FormStyleModernDark());

    // Set dark mode
    Application.Current.UserAppTheme = AppTheme.Dark;

    // Refresh the form
    MyFormView.RefreshForm();
}
Want to create your own theme? Just define 30 XAML styles. The documentation lists them all, but here are the key ones:
<ResourceDictionary xmlns="http://schemas.microsoft.com/dotnet/2021/maui"
                    xmlns:x="http://schemas.microsoft.com/winfx/2009/xaml">

    <!-- Input Border - Normal State -->
    <Style x:Key="inputBorder" TargetType="Border">
        <Setter Property="Stroke" Value="#2196F3" />
        <Setter Property="StrokeThickness" Value="2" />
        <Setter Property="StrokeShape" Value="RoundRectangle 8" />
        <Setter Property="BackgroundColor" Value="White" />
        <Setter Property="Padding" Value="12,8" />
    </Style>

    <!-- Input Border - Error State -->
    <Style x:Key="inputBorderError" TargetType="Border">
        <Setter Property="Stroke" Value="#F44336" />
        <Setter Property="StrokeThickness" Value="2" />
        <Setter Property="StrokeShape" Value="RoundRectangle 8" />
        <Setter Property="BackgroundColor" Value="#FFEBEE" />
    </Style>

    <!-- Save Button -->
    <Style x:Key="formSave" TargetType="Button">
        <Setter Property="BackgroundColor" Value="#4CAF50" />
        <Setter Property="TextColor" Value="White" />
        <Setter Property="FontSize" Value="16" />
        <Setter Property="FontAttributes" Value="Bold" />
        <Setter Property="CornerRadius" Value="8" />
        <Setter Property="Padding" Value="20,12" />
    </Style>

    <!-- ... 27 more styles ... -->
</ResourceDictionary>
The forms automatically pick up your custom styles. No code changes needed.
Step 4: Loading Data from the Backend
Here's where it gets interesting. I have a REST API that returns customer data. Let me show you how I connect it to the form.
First, my API service:
public class CustomerApiService
{
    private readonly HttpClient _httpClient;

    public CustomerApiService(HttpClient httpClient)
    {
        _httpClient = httpClient;
    }

    public async Task<CustomerDto> GetCustomerAsync(int customerId)
    {
        var response = await _httpClient.GetAsync($"api/customers/{customerId}");
        response.EnsureSuccessStatusCode();

        var json = await response.Content.ReadAsStringAsync();
        return JsonSerializer.Deserialize<CustomerDto>(json);
    }

    public async Task<CustomerDto> UpdateCustomerAsync(CustomerDto customer)
    {
        var content = new StringContent(
            JsonSerializer.Serialize(customer),
            Encoding.UTF8,
            "application/json");

        var response = await _httpClient.PutAsync(
            $"api/customers/{customer.Id}",
            content);

        response.EnsureSuccessStatusCode();

        var json = await response.Content.ReadAsStringAsync();
        return JsonSerializer.Deserialize<CustomerDto>(json);
    }
}
My DTO (Data Transfer Object):
public class CustomerDto
{
    public int Id { get; set; }
    public string CompanyName { get; set; } = "";
    public string ContactPerson { get; set; } = "";
    public string Email { get; set; } = "";
    public string Phone { get; set; } = "";
    public string Street { get; set; } = "";
    public string City { get; set; } = "";
    public string PostalCode { get; set; } = "";
    public string Country { get; set; } = "";
    public bool IsActive { get; set; }
    public string Notes { get; set; } = "";
}
Now, loading data into the form is stupidly simple:
using Plugin.Maui.DynamicForms.Helpers;

private CustomerApiService _apiService;
private CustomerDto _currentCustomer;

private async Task LoadCustomerAsync(int customerId)
{
    try
    {
        // Show loading indicator
        MyFormView.IsEnabled = false;

        // Fetch from API
        _currentCustomer = await _apiService.GetCustomerAsync(customerId);

        // Map DTO to form fields
        _formFields = FormDataConverter.Dto2FormData(_formFields, _currentCustomer);

        // Update the form
        MyFormView.FormFields = _formFields;
    }
    catch (Exception ex)
    {
        await DisplayAlertAsync("Error",
            $"Failed to load customer: {ex.Message}",
            "OK");
    }
    finally
    {
        MyFormView.IsEnabled = true;
    }
}
That's it. The FormDataConverter automatically maps your DTO properties to form fields. It handles:
- ✅ Strings
- ✅ Numbers (int, decimal, double)
- ✅ Booleans
- ✅ Dates
- ✅ Enums
No manual mapping. No reflection magic you have to debug. It just works.
Step 5: Validating with FluentValidation
I'm a huge fan of FluentValidation. Clean, readable, testable validation rules. Here's how I set it up:
First, install FluentValidation:
dotnet add package FluentValidation
Create your validator:
using FluentValidation;

public class CustomerValidator : AbstractValidator<CustomerDto>
{
    public CustomerValidator()
    {
        RuleFor(x => x.CompanyName)
            .NotEmpty().WithMessage("Company name is required")
            .MinimumLength(2).WithMessage("Company name must be at least 2 characters")
            .MaximumLength(100).WithMessage("Company name cannot exceed 100 characters");

        RuleFor(x => x.ContactPerson)
            .NotEmpty().WithMessage("Contact person is required")
            .MinimumLength(2).WithMessage("Contact person must be at least 2 characters");

        RuleFor(x => x.Email)
            .NotEmpty().WithMessage("Email is required")
            .EmailAddress().WithMessage("Please enter a valid email address");

        RuleFor(x => x.Phone)
            .Matches(@"^\+?[1-9]\d{1,14}$")
            .When(x => !string.IsNullOrEmpty(x.Phone))
            .WithMessage("Please enter a valid phone number");

        RuleFor(x => x.Street)
            .NotEmpty().WithMessage("Street address is required");

        RuleFor(x => x.City)
            .NotEmpty().WithMessage("City is required");

        RuleFor(x => x.PostalCode)
            .Matches(@"^\d{5}(-\d{4})?$")
            .When(x => x.Country == "USA")
            .WithMessage("Invalid US postal code format");

        RuleFor(x => x.Country)
            .NotEmpty().WithMessage("Please select a country");
    }
}
Now, create an adapter (I keep this in my project as a reusable class):
using FluentValidation;
using Plugin.Maui.DynamicForms.Validation;
using Plugin.Maui.DynamicForms.Models;
using Plugin.Maui.DynamicForms.Helpers;

public class FluentValidationFieldValidator<T> : IFieldValidator where T : class, new()
{
    private readonly IValidator<T> _validator;

    public FluentValidationFieldValidator(IValidator<T> validator)
    {
        _validator = validator;
    }

    public bool CanValidate(FieldMetaData field) => true;

    public ValidationResult Validate(FieldMetaData field)
    {
        return Validate(field, new List<FieldMetaData>());
    }

    public ValidationResult Validate(FieldMetaData field, List<FieldMetaData> allFields)
    {
        // Convert form to DTO
        var dto = FormDataConverter.FormData2Dto(allFields, new T());

        // Validate using FluentValidation
        var result = _validator.Validate(dto);

        if (result.IsValid)
            return Plugin.Maui.DynamicForms.Validation.ValidationResult.Success();

        // Get errors for this specific field
        var fieldErrors = result.Errors
            .Where(e => e.PropertyName.Equals(field.Property, StringComparison.OrdinalIgnoreCase))
            .Select(e => e.ErrorMessage)
            .ToList();

        return fieldErrors.Any()
            ? Plugin.Maui.DynamicForms.Validation.ValidationResult.Failure(fieldErrors)
            : Plugin.Maui.DynamicForms.Validation.ValidationResult.Success();
    }
}
Hook it up to your form:
private void SetupValidation()
{
    // Add FluentValidation
    MyFormView.FieldValidators.Add(
        new FluentValidationFieldValidator<CustomerDto>(new CustomerValidator())
    );

    // Enable validation on save
    MyFormView.ValidateOnSave = true;

    // Listen to validation events
    MyFormView.ValidatedForm += OnFormValidated;
}

private async void OnFormValidated(object? sender, FormValidationEventArgs e)
{
    if (!e.IsValid)
    {
        var errorMessages = string.Join("\n",
            e.ValidationResults
                .Where(r => !r.Value.IsValid)
                .SelectMany(r => r.Value.ErrorMessages));

        await DisplayAlertAsync("Validation Failed",
            $"Please correct the following errors:\n\n{errorMessages}",
            "OK");
    }
}
Now your form validates in real-time. As the user types, fields turn red when invalid, green when valid (or more exact: as your style says). Error messages appear below each field. It's beautiful.
Step 6: Saving Back to the Backend
Finally, the save operation. Here's what I love - you get the validated data back as form fields, convert to DTO, and send to the API:
private void SetupFormSaveHandler()
{
    MyFormView.FormSaved += async (sender, e) =>
    {
        await SaveCustomerAsync(e.FormFields);
    };
}

private async Task SaveCustomerAsync(List<FieldMetaData> formFields)
{
    try
    {
        // Disable form during save
        MyFormView.IsEnabled = false;

        // Convert form fields back to DTO
        var updatedCustomer = FormDataConverter.FormData2Dto(formFields, _currentCustomer);

        // Save to API
        var savedCustomer = await _apiService.UpdateCustomerAsync(updatedCustomer);

        // Update local reference
        _currentCustomer = savedCustomer;

        // Success!
        await DisplayAlertAsync("Success",
            "Customer information updated successfully!",
            "OK");

        // Navigate back or refresh
        await Navigation.PopAsync();
    }
    catch (HttpRequestException ex)
    {
        await DisplayAlertAsync("Network Error",
            $"Failed to save: {ex.Message}\nPlease check your connection.",
            "OK");
    }
    catch (Exception ex)
    {
        await DisplayAlertAsync("Error",
            $"An unexpected error occurred: {ex.Message}",
            "OK");
    }
    finally
    {
        MyFormView.IsEnabled = true;
    }
}
Putting It All Together
Here's the complete page code:
using Plugin.Maui.DynamicForms.Controls;
using Plugin.Maui.DynamicForms.Factories;
using Plugin.Maui.DynamicForms.Helpers;
using Plugin.Maui.DynamicForms.Models;
using Plugin.Maui.DynamicForms.Validation;

namespace YourApp.Pages;

public partial class CustomerFormPage : ContentPage
{
    private readonly CustomerApiService _apiService;
    private List<FieldMetaData> _formFields;
    private CustomerDto _currentCustomer;
    private readonly int _customerId;

    public CustomerFormPage(CustomerApiService apiService, int customerId)
    {
        InitializeComponent();

        _apiService = apiService;
        _customerId = customerId;

        BuildForm();
        SetupValidation();
        SetupFormSaveHandler();
    }

    protected override async void OnAppearing()
    {
        base.OnAppearing();
        await LoadCustomerAsync(_customerId);
    }

    private void BuildForm()
    {
        _formFields = new FormBuilder()
            .BeginBlock("Customer Information")
                .AddTextField("CompanyName")
                    .WithCaption("Company Name")
                    .WithRequiredValidation()
                .AddTextField("ContactPerson")
                    .WithCaption("Contact Person")
                    .WithRequiredValidation()
                .AddTextField("Email")
                    .WithCaption("Email Address")
                    .WithRequiredValidation()
                .AddTextField("Phone")
                    .WithCaption("Phone Number")
            .NextBlock()
            .BeginBlock("Address Details")
                .AddTextField("Street")
                    .WithCaption("Street Address")
                    .WithRequiredValidation()
                .AddTextField("City")
                    .WithCaption("City")
                    .WithRequiredValidation()
                .AddTextField("PostalCode")
                    .WithCaption("Postal Code")
                .AddSelect("Country", "USA,Canada,UK,Germany,France,Spain")
                    .WithCaption("Country")
                    .WithRequiredValidation()
            .NextBlock()
            .BeginBlock("Additional Information", isExpanded: false)
                .AddCheckbox("IsActive")
                    .WithCaption("Active Customer")
                .AddTextArea("Notes")
                    .WithCaption("Internal Notes")
            .Build();

        MyFormView.FormFields = _formFields;
    }

    private void SetupValidation()
    {
        MyFormView.FieldValidators.Add(
            new FluentValidationFieldValidator<CustomerDto>(new CustomerValidator())
        );
        MyFormView.ValidateOnSave = true;
        MyFormView.ValidatedForm += OnFormValidated;
    }

    private void SetupFormSaveHandler()
    {
        MyFormView.FormSaved += async (sender, e) =>
        {
            await SaveCustomerAsync(e.FormFields);
        };
    }

    private async Task LoadCustomerAsync(int customerId)
    {
        try
        {
            MyFormView.IsEnabled = false;
            _currentCustomer = await _apiService.GetCustomerAsync(customerId);
            _formFields = FormDataConverter.Dto2FormData(_formFields, _currentCustomer);
            MyFormView.FormFields = _formFields;
        }
        catch (Exception ex)
        {
            await DisplayAlertAsync("Error",
                $"Failed to load customer: {ex.Message}", "OK");
        }
        finally
        {
            MyFormView.IsEnabled = true;
        }
    }

    private async Task SaveCustomerAsync(List<FieldMetaData> formFields)
    {
        try
        {
            MyFormView.IsEnabled = false;
            var updatedCustomer = FormDataConverter.FormData2Dto(formFields, _currentCustomer);
            var savedCustomer = await _apiService.UpdateCustomerAsync(updatedCustomer);
            _currentCustomer = savedCustomer;

            await DisplayAlertAsync("Success",
                "Customer information updated successfully!", "OK");
            await Navigation.PopAsync();
        }
        catch (Exception ex)
        {
            await DisplayAlertAsync("Error",
                $"Failed to save: {ex.Message}", "OK");
        }
        finally
        {
            MyFormView.IsEnabled = true;
        }
    }

    private async void OnFormValidated(object? sender, FormValidationEventArgs e)
    {
        if (!e.IsValid)
        {
            var errorMessages = string.Join("\n",
                e.ValidationResults
                    .Where(r => !r.Value.IsValid)
                    .SelectMany(r => r.Value.ErrorMessages));

            await DisplayAlertAsync("Validation Failed",
                $"Please correct these errors:\n\n{errorMessages}", "OK");
        }
    }
}
What I Love About This Approach
After using this library for a few months, here's what stands out:
1. Speed
I can build a complex, multi-section form in 10 minutes. Not 2 hours. Not a day. 10 minutes.
2. Maintainability
Need to add a field? One line of code. Remove a field? Delete one line. Change validation? Update the FluentValidation rules. No XAML hunting.
3. Consistency
Every form in my app looks identical. Same spacing, same colors, same behavior. Users love it, and I didn't have to copy-paste styles everywhere.
4. Backend Integration
The DTO conversion is pure magic. Load from API, edit in form, save back to API. Three lines of code each way.
5. Validation That Actually Works
FluentValidation integration means my business rules live in one place. And the real-time validation feedback? Game changer for UX.
Gotchas I Learned
Nothing's perfect. Here are a few things to watch out for:
Android Keyboard on .NET 10
If you're on .NET 10, you'll need to add this to your App.xaml.cs:
#if ANDROID
On<Microsoft.Maui.Controls.PlatformConfiguration.Android>()
    .UseWindowSoftInputModeAdjust(WindowSoftInputModeAdjust.Resize);
#endif
And add SafeAreaEdges="All" to your ContentPage. Otherwise, the keyboard covers your Save button. Ask me how I know.
Property Name Matching
The DTO property names must match your field Property names. Case-insensitive, but they must match. CompanyName in DTO = "CompanyName" in FormBuilder.
CommunityToolkit.Maui Version
Make sure you're on CommunityToolkit.Maui 12.1.0 or higher. Earlier versions have some layout quirks.
Real-World Results
I've shipped three apps using this library now:
- Admin panel with 15+ forms - built in 2 days
- Data collection app with conditional forms - validation logic centralized, zero bugs after initial testing
- Settings screen with 8 tabs - users say it's the cleanest settings UI they've used
The time savings are real. But more importantly, the code is maintainable. When a business rule changes, I update one validator. Done.
Try It Yourself
The library is open source and free (MIT license). Grab it from NuGet:
dotnet add package Plugin.Maui.DynamicForms
Full docs and 9 example forms at: https://github.com/corweg/Plugin.Maui.DynamicForms
If you build something cool with it, let me know. I'd love to see it.
What's Next?
I'm working on:
- Template system for common form patterns (address, payment, etc.)
- Conditional field visibility (show Field B only if Field A = "Yes")
- Multi-page wizards with progress tracking
- Async validation for API-based checks (username availability, etc.)
If you want to contribute or have feature requests, the GitHub repo is open. Pull requests welcome.
Final Thoughts
Building forms doesn't have to suck. It shouldn't take hours to create something users interact with for seconds. With the right tools, you can focus on business logic instead of XAML gymnastics.
This library saved me probably 100+ hours in the last year. Hope it saves you some too.
Happy coding! 🚀
P.S. - If you're still copy-pasting XAML for forms, you owe it to yourself to try this. Just once. You might not go back.
About the Author
I'm a full-stack developer who got tired of writing the same forms over and over. So I built Plugin.Maui.DynamicForms with my colleague Ralf Corinth. We've been building software for longer than we'd like to admit, and we still get excited about tools that make our lives easier.
Find me on GitHub: @weggetor
Project: Plugin.Maui.DynamicForms
Resources
- NuGet Package: https://www.nuget.org/packages/Plugin.Maui.DynamicForms
- GitHub Repository: https://github.com/corweg/Plugin.Maui.DynamicForms
- Documentation: Complete API Reference
- Sample App: 9 Working Examples